

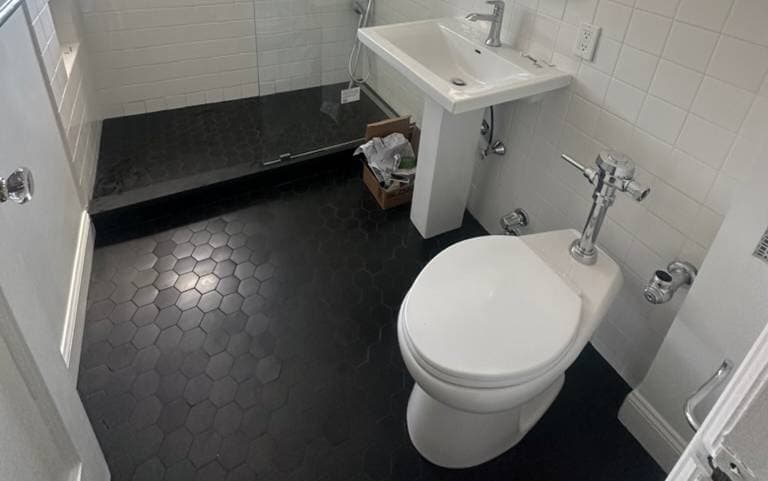
We just wrapped an accessible bathroom renovation in Sleepy Hollow, and it’s a good example of what aging in place looks like when it’s designed in from the start rather than bolted on afterward.
The brief was simple to say and harder to build: a bathroom the homeowner can use independently now and in twenty years, that doesn’t look like a hospital room. No curb to step over. No door to fight with. A shower you can walk into, roll into, or sit down in.
The best part of a curbless shower is the part nobody notices. You walk in, and there’s simply no lip. All the work is underneath.
A zero-threshold shower has to do two things at once: finish flush with the surrounding bathroom floor, and still move every drop of water toward the drain. Get the pitch wrong and water leaves the shower — which is why so many “curbless” showers end up with a rolled towel permanently parked at the edge.
We recessed the shower floor into the framing so the finished tile lands level with the rest of the room, then built a consistent slope to a linear drain set along the wall. A linear drain lets the floor pitch in one direction instead of four. That means larger tile, far fewer cuts, and a surface that’s easier to roll across and steadier to stand on. Under the tile, a fully bonded waterproofing membrane runs the pan and carries up the walls.
No door, no track, no glass to squeegee. Just an opening wide enough for a wheelchair or a walker, and a wet zone laid out so water has nowhere to go but down the drain.


- A built-in bench seat, set at seat height and positioned within easy reach of the controls and the sprayer.
- A handheld sprayer on a long hose — usable seated, standing, or by someone helping. It is also, quietly, the best tool ever invented for cleaning a shower.
- A lowered sink with open knee space underneath, so it works seated or standing.
- A comfort-height toilet with proper side clearance and solid blocking in the walls for grab bars.
- Lever handles and slip-resistant tile throughout — small choices that matter every single day.
If you are thinking about this for your own home, we wrote a companion piece on the wider picture: Transform Your Bathroom for Aging in Place.
Worth saying plainly, because a lot of contractor websites blur it: the Americans with Disabilities Act is a civil rights law covering public accommodations and commercial buildings. It does not legally apply to a private single-family house.
But its dimensions are the most thoroughly tested accessibility standards we have. So when a homeowner asks for an “ADA bathroom,” what they almost always mean is “build it to those numbers.” That is how we build them — not because a code official is going to measure, but because those figures come from decades of real-world use rather than guesswork.

The dimensions below come from the 2010 ADA Standards for Accessible Design. Use them as your benchmark whether or not the law technically applies to your project.
- Use a linear drain and get the slope right. Not a standards requirement, but the single biggest determinant of whether a curbless shower actually works. One direction of pitch, one plane of tile, no ponding.
- Go curbless at the shower entry. The standards permit a threshold of ½" maximum, beveled at 1:2 if it exceeds ¼". Zero is better than the maximum every time. (§608.2.3)
- Set the toilet at the right height and distance. Seat height 17" to 19", centerline 16" to 18" from the side wall. (§604.2, §604.4)
- Make the sink roll-under. Rim or counter no higher than 34" above the floor, with knee clearance at least 27" high and 30" wide beneath it. Insulate or panel any exposed hot water piping. (§606.2, §606.3)
- Install grab bars properly — and block the walls first. 33" to 36" to the top of the gripping surface, 1¼" to 2" outside diameter, exactly 1½" of space between bar and wall. They must withstand 250 pounds of force at any point, which means real backing in the framing, not drywall anchors. (§609.2.1, §609.3, §609.4, §609.8)
- Size the shower for actual movement. A standard roll-in compartment is 30" deep minimum by 60" wide minimum. A transfer shower is 36" by 36" — and those are absolute dimensions, not minimums. (§608.2.1, §608.4)
- Fit a handheld sprayer on a long hose. The standards call for a hose at least 59" long, and shower controls no more than 48" above the shower floor. (§607.6, §608.2.1)
- Add a bench or fold-down seat. 17" to 19" above the finished floor, 15" to 16" deep from the seat wall. (§608.4)
- Choose controls you can work with one hand. Everything operable without tight grasping, pinching or twisting of the wrist, and requiring no more than 5 pounds of force. Lever handles, paddle faucets, rocker switches. (§309)
- Leave room to turn around. A 60" diameter turning circle, or a T-shaped space with 36" arms, plus 32" of clear width at the doorway. This is the requirement most often missed, because it gets decided at framing — long before anyone is picking tile. (§304, §404.2.3)
One more that isn’t on the list: lighting and contrast. Bright, even light with no glare, and a visible tonal difference between the floor, the walls and the fixtures. It costs almost nothing at the planning stage and it makes the room genuinely easier to use.
Most of these decisions are made during framing and rough plumbing, which is exactly why retrofitting later is so much more expensive than building it in now. If accessibility is somewhere on your horizon — for yourself, a parent, or resale — it is worth designing for on the first pass.
Ormeno Construction is a family-owned general contractor based in White Plains, serving Sleepy Hollow and the surrounding river towns. See our bathroom remodeling services, or get in touch for a free estimate.